
It makes developers life easy to have a separate puppetmaster, since it gives flexibility to alter the puppetmaster and test new features. Also having a puppetmaster in the same host virtualbox will help to avoid network latencies. This tutorial gives step by step guidance on installing and configuring AppFactory puppetmaster in a virtualbox.
Steps
- Create a new linx instance in virtualbox. (I am using ubuntu 14.04 instance for this tutorial) Follow this [1] tutorial to create a ubuntu vm.
- Configure networking interfaces in VM to access internet and communicate with the local machine.
- Configure VM to access Internet.
Set up one of your new virtual machine’s networking adapters to NAT. This is the default so you might not need to change anything.
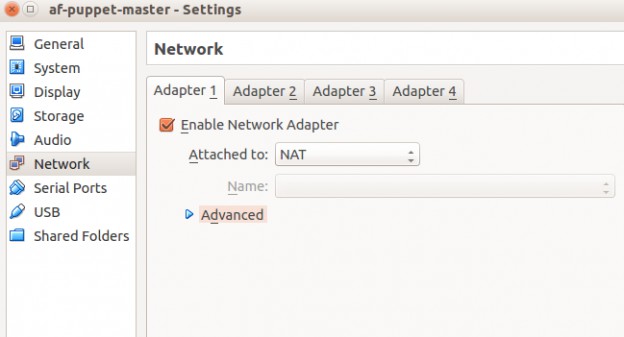
This will allow the vm to access the broader internet through your host’s connection. You’ll be able to download packages. However, you cannot access any vm resources from your host machine yet.
- Configure VM to access Internet.
Set up one of your new virtual machine’s networking adapters to NAT. This is the default so you might not need to change anything.
-
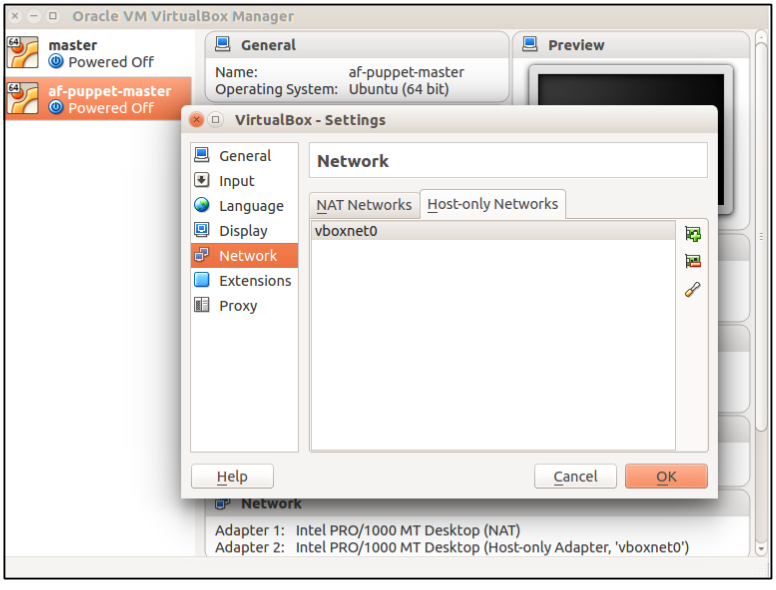
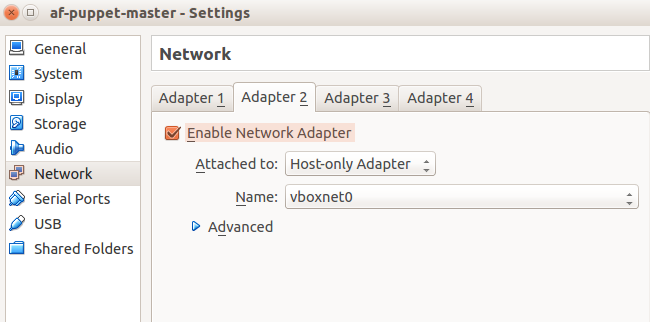
Add a host-only network interface We’ll need to add another network adapter to the vm, this time, it’ll be a Host-Only Adapter. By using this type of adapter, you’ll be able to access a private, virtual network consisting solely of your host and any guests. Any of the member vm’s can access each other, but nothing outside of this self-contained can get in. You might need to create a host-only network from File > Preferences > VirtualBox -Settings
-
Configure an IP address to host-only network We need to have a static IP for the puppetmaster server. Login to the server and execute the following command
$ifconfig eth1 192.168.56.101 netmask 255.255.255.0 up
(Use whatever IP on your host-only network you like, of course.) This binds a network interface to one of the IP addresses on your host-only network (eth0 was bound to the NAT adapter). Now you should be able to SSH into your guest from your host (for example) using this IP address.
This is just temporary, however; once you reboot, this configuration will disappear. To make it permanent, add this to your /etc/network/interfaces file (as root):
# host-only network interface
auto eth1
iface eth1 inet static
address 192.168.56.101
netmask 255.255.255.0
network 192.168.56.0
broadcast 192.168.56.255
Start the eth1 network interface
$ifconfig eth1 up
and this interface should now show up when you type ifconfig.
- Optional : Configuring ssh access to the vm.
Sometime you’ll find it’s easy to use the vm terminal from your host machine, for that you’ll need to install a sh server in the VM.
sudo apt-get install openssh-server
- Configure hostname for puppet master I’m going to use puppet.apfactory.wso2.com as the puppetmaster hostname. Execute the following command as the root user
$ hostname puppet.appfactory.wso2.com > /etc/hostname
$ echo "192.168.56.101 puppet.appfactory.wso2.com" >> /etc/hosts
Make sure to use the IP address of the host-only interface for the above command.
- Install Puppet Master Note : Be sure to use Puppet Master version 3.7 or above
If you are setting up appfactory in a different linux distribution,make sure to add correct puppet repositories
$wget https://apt.puppetlabs.com/puppetlabs-release-trusty.deb
$sudo dpkg -i puppetlabs-release-precise.deb
$sudo apt-get update
$sudo apt-get install puppetmaster
- Configuring a file server to manage appfactory distribution packs. I am using apache2 for this tutorial.
$sudo apt-get install apache2
We need this file server to manage the distribution packs of all products involved in an App Factory deployment, such as WSO2 App Factory, API Manager, ELB, application Server etc
| WSO2 Products | Other Products |
|---|---|
| wso2appfactory-2.1.0.zip | apache-maven-3.0.5-bin.tar.gz |
| wso2as-5.2.1.zip | apache-activemq-5.9.1-bin.tar.gz |
| wso2bam-2.4.1.zip | apache-stratos-4.0.0-wso2v1.zip |
| wso2bps-3.2.0.zip | apache-stratos-cartridge-agent-4.0.0-wso2v1-bin.zip |
| wso2mb-2.2.0.zip | apache-stratos-load-balancer-4.0.0-wso2v1.zip |
| wso2ss-1.1.0.zip | gitblit-1.4.1.zip |
| wso2ues-1.1.0.zip | jdk-7u51-linux-x64.tar.gz |
| wso2-private-paas-4.0.0-installer.zip | mysql-connector-java-5.1.29-bin.jar |
- Configure apache2 to point to /var/www/software as document root. Edit the /etc/apache2/sites-enabled/000-default.conf with the following configuration
 <VirtualHost *:80>
        ServerAdmin webmaster@localhost
        DocumentRoot /var/www/software
        ErrorLog ${APACHE_LOG_DIR}/error.log
        CustomLog ${APACHE_LOG_DIR}/access.log combined
</VirtualHost>
Restart the apache2 service
$sudo service apache2 restart
Now if you browse to 192.168.56.101 url from your host machine web browser you should be able to see the packages we have coppied to /var/www/software folder. You cannot proceed without this step.
- Configure puppet master
- Install git
$sudo apt-get install git - Clone appfactory source
$ git clone https://github.com/wso2/product-af.git - Copy puppet manifest to adesired location.
$ cp product-af/modules/puppet-manifests /home/master - Update the configurations in nodes.pp
Update the following parameters of the puppet-manifests/appfactory/manifests/nodes.pp
$package_repo = 'http://192.168.56.101'Add the correct package repository url created in step 5
$domain = 'appfactory.wso2.com'
Update only the first occurance of the above parameter
$hosts_mapping  = [
      "192.168.56.101,puppet.${domain}]
In $hosts_mapping there’s a hard coded IP change it to the puppet master IP Then update the Iaas provider information with your IaaS configurations
## Private paas configurations
$stratos_domain     = "paas.${wso2_env_domain}"
#Private paas IAAS configuration
$iaas                 = "os"
$iaas_region          = "RegionOne"
$iaas_cartridge_image = "34dd924f-ef3d-49ae-884a-4784f0330f1b"
$os_identity          = "openstackDemo:admin"
$os_credentials       = "password"
$os_jclouds_endpoint  = "http://appfactorycloud.private.wso2.com:5000/v2.0"
$os_keypair_name      = "appfackey"
$os_security_groups   = "default
- Edit /etc/puppet/puppet.conf file with the following configurations
[main]
logdir=/var/log/puppet
vardir=/var/lib/puppet
ssldir=/var/lib/puppet/ssl
rundir=/var/run/puppet
factpath=$vardir/lib/facter
templatedir=$confdir/templates

[master]
# These are needed when the puppetmaster is run by passenger
# and can safely be removed if webrick is used.
ssl_client_header = SSL_CLIENT_S_DN
ssl_client_verify_header = SSL_CLIENT_VERIFY
autosign=true

[appfactory]
environment=appfactory
modulepath=/home/master/puppet-manifests/appfactory/modules
templatedir=/home/master/puppet-manifests/appfactory/templates
manifest=/home/master/puppet-manifests/appfactory/manifests/site.pp
manifestdir=/home/master/puppet-manifests/appfactory/manifests/
Here the additional configs compared to the default puppet.conf are; autosign=true in [master] This configuration allows to sign the certificates requests without manual intervention.(use this configuration only in a development environment to prevent security vulnerabilities)
[appfactory]
environment=appfactory
modulepath=<appfactory puppet-manifest HOME>/appfactory/modules
templatedir=<appfactory puppet-manifest HOME>/appfactory/templates
manifest=<appfactory puppet-manifest HOME>/appfactory/manifests/site.pp
manifestdir=<appfactory puppet-manifest HOME>/appfactory/manifests/
That’s all you need to setup appfactory with minimal configurations. To install appfactory follow the On-Premise installation guide [4]. Here instead of pointing to an external puppet master you could point it to the configured virtual machine IP.